Wednesday, July 31, 2013

Adding a Service Reference to an ASMX Service

If you need to add a Service Reference to a non-WCF Service (namely an ASMX Service), the process of obtaining that Service Reference is not exactly straight forward within the Visual Studio IDE/environment.

Here are the steps that you need to follow:


  1. Add a Service Reference
  2. Type in the Url to the ASMX Service and click on the Go button
  3. Click on the Advanced Button
  4. Click on the Add Web Reference button
  5. Once again type in the Url to the ASMX Service
  6. Click on the arrow icon next to the Address Bar to locate the Web Service (or click on the Enter key)
  7. Enter a name for the Web Reference in the Web Reference Name textbox
  8. Click on Add Reference
  9. You should now have the ASMX Web Reference configured in your project.


Thursday, July 18, 2013

Upgrading a Sitefinity v. 6.x Web Application to ASP.NET v. 4.5

You may have noticed that by default, the Sitefinity Project Manager creates Sitefinity Web Applications only using ASP.NET 4.0.

But what if you want to upgrade your Sitefinity Web Application to ASP.NET 4.5 so that you can take advantage of all of the new and great features that have been included with ASP.NET 4.5?

Well, you can do so, but not directly through any of the Sitefinity tooling.

For this, you have to revert to Visual Studio 2012.


  1. Open up Visual Studio 2012
  2. Select the Sitefinity Web Application project
  3. Since Sitefinity still creates the Web Application projects in Visual Studio 2010 format, you will be prompted to upgrade the Sitefinity Web Application project so that it is compatible with Visual Studio 2012.
  4. Once the project has been upgraded, open the Project Properties and change the Target Framework to .NET Framework 4.5.  
  5. This should effectively upgrade your Web.config file to support .NET 4.5.  NOTE: The only difference between ASP.NET 4.5 and ASP.NET 4.0 is the change in the Web.config file.  The IIS Application Pool remains at ASP.NET 4.0.
  6. You can try building and running the application now.  
  7. If you get an error message while running the application about not being able to find SitefinityWebApp.Global, this is because the Global.asax file has not been included in the Visual Studio project.
  8. Right click on the Global.asax file and select Delete.
  9. Right click on the Visual Studio project and select Add New Item.
  10. Add a new Global Application Class to the project.
  11. Build your project once again (NOTE: A re-build may wipe out your DLL references, therefore, DO NOT select this option!!)
  12. Try running your application once again.  If it is successful, you should not have to make any further changes to your Sitefinity Web Application project.
  13. You can now begin leveraging all of the new features available in ASP.NET 4.5 throughout your Sitefinity Web Application!

Application Pool memory sizes for ASP.NET Hosting Providers

If you have specific memory requirements for the IIS Application Pools in your websites, it is worthwhile to know exactly how much a particular hosting provider is offering as dedicated to your hosting website as part of their various hosting packages.


  1. For a provider such as WinHost, the highest application pool memory size they offer is 300 MB: http://www.winhost.com/windows-hosting-plans.aspx
  2. For a provider such as Arvixe, you get 200 MB for a Personal Class ASP hosting site, while a Business Class ASP site can bump you up to 800 MB for an application pool: https://support.arvixe.com/index.php?/Knowledgebase/Article/View/192/4/resource-usage-explained
  3. For a provider such as SmarterASP.NET, you get a range of 128 MB to 512 MB, however, SmarterASP.NET support states that this memory limit is PER ACCOUNT rather than per application pool or per website: http://www.smarterasp.net/hosting_plans.  Therefore, depending on the number of websites that you host on their account, you may be getting very little memory overall.


Wednesday, July 10, 2013

Reference Guide for HTML5

With all of the new technologies that are related to ASP.NET MVC such as jQuery, jQuery Mobile, jQuery UI, jQuery Validation and Entity Framework, it is difficult to keep up with all of the new features in HTML5, therefore, I thought that I would provide a handy reference guide for anyone who simply wants a listing of the new elements or markup that can be used in HTML5. 

New Elements

  • article
  • aside
  • audio
  • canvas
  • code
  • command
  • datalist
  • details
  • embed
  • figcaption
  • figure
  • footer
  • header
  • hgroup
  • keygen
  • mark
  • meter
  • nav
  • output
  • progress
  • rp
  • rt
  • ruby
  • section
  • source
  • summary
  • time
  • video
  • wbr

New Form Input Types

  • color
  • date
  • datetime
  • datetime-local
  • email
  • month
  • number
  • range
  • search
  • tel
  • time
  • url
  • week

For a more detailed description of each of these HTML5 elements, you can look here: W3 Schools HTML 5 Introduction

Sitefinity features missed since v. 3.7x


If you were a previous Sitefinity v. 3.7x user, there are several features that are missing in even the most recent release of Sitefinity which were originally present in Sitefinity v. 3.7x:

  1. When creating a brand new website, you had the option to select a default website template for creating the site.  This option has been completely removed in the latest release of Sitefinity (Sitefinity v. 6.x at the time of this writing)
  2. Previously, one could easily create polls/surveys in Sitefinity, this feature is also now missing in the latest release and there does not seem to be any indication on the current roadmap of a return of this feature.
  3. One of the most useful features that I miss from Sitefinity v. 3.7x was the ability to add Shared Content widgets into my Master Page templates.  This functionality has not been re-introduced since Sitefinity v. 4.x. 
  4. Sitefinity v. 3.7x also provided the option to browse the entire local file system to upload any content into any directory in the Sitefinity structure.  This feature is also completely gone in the latest release.
  5. Sitefinity v. 3.7x provided the ability to upload User Controls directly that would be subsequently be added to the Sitefinity Toolbox.  The Sitefinity Toolbox configuration is a completely manual configuration now (at least for ASP.NET User Controls)
  6. Sitefinity v. 3.7x used to provide counts of items such as Pages in the Page editing view.  This is also sorely needed in the latest version of Sitefinity.
  7. Sitefinity v. 3.7x Community Edition provided unlimited content editing abilities but provided a restriction of a single administrative user and being branded with the Telerik Sitefinity logo.  In addition, the licensing for Community Edition allowed it to be use for both commercial and non-commercial projects.  Sitefinity Community Edition today only allows a maximum of 25 Content Pages, still requires the branding logo and only officially provides licensing for non-commercial/non-profit projects.
  8. In Sitefinity v. 3.7x, I could use standard methods of securing content in ASP.NET projects by simply dropping a Web.config file into my Sitefinity project structure in order to secure the content.  This feature is now completely absent in the latest release of Sitefinity and requires manual coding (usually in the Global.asax) in order to reproduce the former functionality.
  9. Sitefinity v. 3.7x Standard Edition was very reasonably priced at $769 when it was generally available.  Sitefinity v. 3.7x Standard Edition was also the only edition available.  In contrast, Sitefinity Standard Edition today has increased to a whopping $2000!!  While Sitefinity Small Business Edition is more affordably priced at $499, it is limited to only 50 content pages and is missing some of the essential newer features such as the Forms module and workflow approval which is present in only Sitefinity Standard Edition and above.
  10. Most of all, Sitefinity v. 3.7x was very fast and low on memory consumption.  Therefore, it could be deployed to nearly any hosting provider without much issue or difficulty.  The latest version of Sitefinity requires a whopping 512 MB of memory for the application pool, thus severely restricting available hosting provider plans.  In addition, if less memory than this is allocated to the application pool used to host Sitefinity, one will typically experience slow load times as well as various other quirks and defects related to frequent application pool recycling when the memory limits are reached.

Tuesday, July 9, 2013

Difficulties to expect while transitioning from ASP.NET Web Forms to ASP.NET MVC

If you are in the process of upgrading or migrating to ASP.NET MVC from ASP.NET Web Forms, here are some things you should know before beginning your migration:
  1. ASP.NET MVC no longer has DataSource controls that you can use for performing Data Binding.  Instead, you have to perform Model Binding.  Models are usually classes and can either be populated through your Controller or can be bound directly to Entity Framework classes.  The use of ADO.NET in ASP.NET MVC projects has been largely replaced by the use of Entity Framework and LINQ.
  2. ASP.NET MVC no longer has the concept of a code-behind and server side events.  Instead, all operations are performed in your Controller and the only 2 major events you have to handle are [HttpGet] and [HttpPost].  All other events need to be handled client side.
  3. ASP.NET MVC no longer has any server side Web Controls whatsoever.  Instead, you have to work with Html Helpers.  These code snippets simply help you generate the standard HTML you would normally generate using the ASP.NET Web Server controls.  Of course, as you can guess from the previous bullet points, no server events are exposed with these Html Helpers.
  4. If you want to perform Validation, you have to leverage validation capabilities available through Data Annotations in Model Binding as well as client-side validation performed using the jQuery Validation Library. 
  5. Most of the rich set of controls that were previously available in ASP.NET Web Forms either directly through Microsoft or through 3rd party control vendors have been largely replaced by jQuery, jQuery Plugins and jQuery UI.  If you cannot find what you need amongst those libraries, you may have to hunt around on the Internet or for other 3rd party vendor controls such as Telerik Kendo UI, Infragistics IgniteUI, ComponentOne Wijmo or various others.  Of course, many of these libraries are still missing functionality found in some of the ASP.NET Web Server controls such as the FormView control and the Wizard control.
  6. Whereas most 3rd party controls in ASP.NET Web Forms used built-in styles and skins through bundling of resources directly into the .NET assemblies, 3rd party controls now heavily rely on the use of external stylesheets to be included as part of the Views in order for the controls to render properly.
  7. While you can still use .aspx pages in ASP.NET MVC Views, the general standard for ASP.NET MVC Views is now .cshtml with the Razor syntax.  Though it is possible to mix-and-match .aspx views with .cshtml views, it is very tricky and generally not recommended.
  8. ASP.NET MVC Views do not provide a Design view (and consequently no drag and drop features).  Therefore, all of your UI development has to be performed in Source code view.  
  9. While you can easily create an ASP.NET Hybrid application (ASP.NET Web Forms and ASP.NET MVC) in Visual Studio 2013 using ASP.NET 4.5, configuring your projects to do this in Visual Studio 2010 and Visual Studio 2012 is still largely a manual process.

Visual Studio 2013 Preview First Look

If you have not already downloaded and installed Visual Studio 2013 Preview, you can download it from here: http://www.microsoft.com/visualstudio/eng/2013-downloads

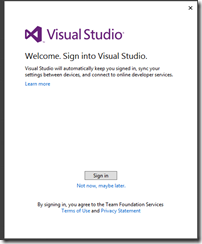
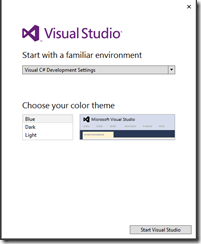
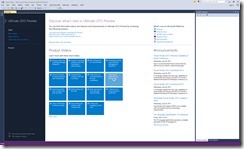
With the Visual Studio 2013 Preview, Microsoft has made some very welcome changes to the User Interface.  First and foremost, Microsoft has brought back much (but not all) of the color that was formerly lost with the release of Visual Studio 2012.  In addition, Microsoft has also added some enhancements to the initial start-up process:

SignInPage

SetUpPage

HomeScreen

As you can see from the initial start-up, Microsoft now provides you with the ability to sign into Visual Studio using your Windows Live ID in order to provide synchronization capabilities across your computers for such things as your Visual Studio settings.  Therefore, if you typically use Visual Studio across multiple computers (such as work desktop and a work laptop), then you no longer have to worry about synchronizing any setting changes between the 2 different machines/environments!  A very handy feature indeed!

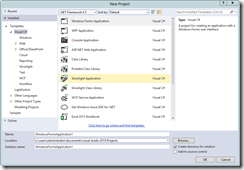
Next, as you can see from the New Project dialog, Microsoft has not “colorized” the New Project dialog back to the way it was in Visual Studio 2010 and has simply retained the black, white and gray color schemes left over from Visual Studio 2012:

NewProjectDialog

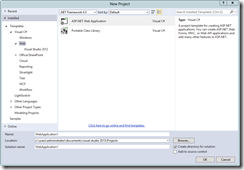
One of the most exciting features about Visual Studio 2013, however, is the new ASP.NET Web Application project type:

ASPNETProject

As you can tell from the image above, the various different ASP.NET project types have been simply eliminated and consolidated into a single ASP.NET Web Application project type. 

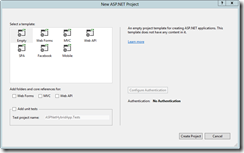
Now, when I create a new ASP.NET Web Application, I have the ability to easily mix-and-match ASP.NET MVC with ASP.NET Web Forms—finally!!!  This will allow development teams that are still attempting to transition and upgrade their applications from ASP.NET Web Forms over to ASP.NET MVC, a much easier and smoother overall process for migration.

ASPNETTemplateSelector

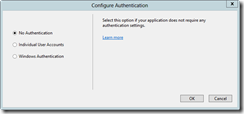
There is also a new Authentication configuration screen which allows easily selecting the type of authentication scheme that needs to be used in your new ASP.NET Web Application.

AuthenticationScreen

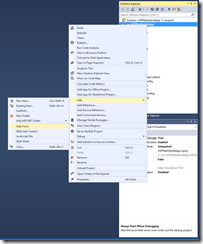
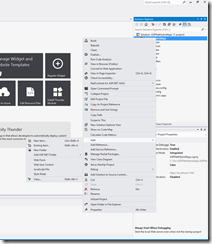
Once your ASP.NET Hybrid (MVC & Web Forms) application has been created, you can see just how easy it is to add ASP.NET Web Forms or Web User controls to your application:

AddWebForms

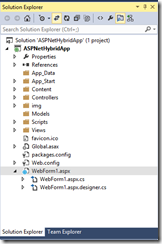
Also, you will notice that they have once again added back color to Solution Explorer particularly for Folders which were sorely missing from the Visual Studio 2012 release:

ASPNETHybridSolution

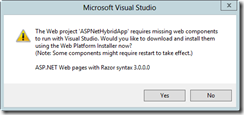
Lastly, just out of curiosity, I attempted to open this newly created solution in Visual Studio 2012:

VS2012Error

While I got this error and proceeded with the Web Platform Installer installation process (which ultimately failed), I was still able to finally successfully render the solution in Visual Studio 2012 and still use the very same features!  Wow!!

VS2012Solution

Using ASP.NET MVC 4 to render customized mobile views

In ASP.NET MVC 4, Microsoft introduced a new feature that allows easily customizing the rendering of Views based on the User Agent string.  This is especially important when working with Mobile devices. 

In ASP.NET Web Forms, we typically had to write some special browser detection code to determine the browser platform and then specially render the screen in order to support the Mobile device.

However, in ASP.NET MVC 4, Microsoft has made this whole process significantly easier!  In ASP.NET MVC 4, through the MVC Design Pattern, we simply have to create a new view to support the Mobile device while our Controller and Model information can remain the same. 

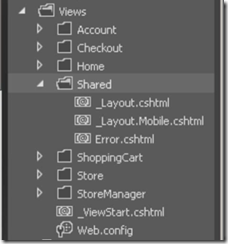
This can be easily done by simply creating a new view with an extension of .Mobile.cshtml (in the case of Razor views).  Therefore, for example, if you wanted to customize the layout for desktop vs. mobile devices, beneath the Views/Shared folder, you could simply create a new View named _Layout.Mobile.cshtml.  ASP.NET MVC 4 will then automatically detect the browser’s User Agent String and render the appropriate view accordingly. 

Just to clarify further, your Views structure should look something like the following screenshot:

MVCMobileViews 

Hopefully migrating to ASP.NET MVC 4 from ASP.NET Web Forms should make it significantly easier to now support mobile devices for your Web Applications.

Monday, July 8, 2013

ASP.NET MVC Views without Model binding

If you converting your existing Classic ASP or ASP.NET WebForms over to ASP.NET MVC Views, you may not be able to use strongly typed views in many cases.  This is especially true if you have a lot of special presentation formatting and logic that you need to preserve from your previous code base.

Fortunately, ASP.NET MVC provides implicit model binding in your views which thereby relieves you of the responsibility of creating all of your ASP.NET MVC Views as strongly typed views.

How does it do that exactly?  Basically, through the use of ViewModels.

If you are not familiar with the concept of a ViewModel, a ViewModel is simply a view of the data that you need in your presentation layer.  The ViewModel acts as a layer of separation between your actual Model (which usually looks nothing like what is required for your presentation view) and your actual View.  A ViewModel essentially represents the object-relational mapping of all of the data that is required for your View in the form of properties on a class.

Therefore, when you create a ViewModel class, you need to explicitly create properties on your class such that they correspond EXACTLY to IDs/names of the fields on your ASP.NET MVC View.  For example, if you have a field called

<input type="text" id="Name" />

Then you will also need a class that has a Name property on it like so:

public class MyViewModel
{
public string Name {get; set;}
}

Now, when you want to pass the entire contents of your ASP.NET MVC View back to your Controller method, you can pass it in the form of a single object (rather than handling Request.Form or Request.QueryString operations):

[HttpPost]
public ActionResult Edit(MyViewModel model)
{
//perform some operations here
//NOTE: you can directly reference the values from your model here
string name = model.Name;
//etc....
}
That is all there is to it!

Monday, July 1, 2013

Understanding ASP.NET MVC for ASP.NET Web Forms Developers

If you are an ASP.NET Web Forms Developer, you may have a hard time initially wrapping your head around how ASP.NET MVC works or is fundamentally different from ASP.NET Web Forms technology.  Well, hopefully, my following brief explanation or summary of how everything fits together will significantly aid you in your understanding of ASP.NET MVC and thereby help you transition your existing applications over to ASP.NET MVC over from ASP.NET Web Forms.

Views (Presentation Layer)

Views in ASP.NET MVC are not fundamentally different from what we have used in the past for ASP.NET Web Forms.  They are just basically an intermingling of ASP.NET Code along with HTML.

If we are using Views with the Razor syntax, the ASP.NET Code is essentially a new form of ASP.NET Data Binding expressions beginning with the @ symbol instead of <%# %> to make the syntax cleaner and more terse.

The fundamental differences you will see in declaring Views is that there is no concept of a code behind file nor is there any longer any concept of using Data Source binding.  Instead, all the binding that is to occur in a View is called "Model Binding"

Let's start with how an ASP.NET MVC View works without a code behind file.  In ASP.NET Web Forms, we tied everything to a Code Behind file and therefore all of our business logic resided in this file.  However, an ASP.NET MVC View is even more loosely coupled in its presentation logic than an ASP.NET Web Form .aspx file.  Instead, it is bound to a Controller.  The Controller is responsible for returning the View as well as any Models to the View that will be used for binding.  The Controller, in most scenarios, will need 2 methods for handling functionality present in ASP.NET Web Forms:


  1. An [HttpGet] method used to handle the traditional if (! Page.IsPostback)  functionality we used to provide in the Page_Load event handler
  2. An [HttpPost] method used to handle any traditional Postback functionality we used to provide in our ASP.NET Code Behind file
The Controller is conventionally bound to the particular View by the solution structure and name.  Therefore, a View in a SampleWidget folder, will be bound to a Controller named SampleWidgetController.

Also, as you can probably guess, since the Code Behind file no longer exists in ASP.NET MVC views, all of the ASP.NET Web Forms controls that we have grown to love are no longer available for us to use.  Instead, we have to rely on the new features provided in HTML5 as well as Html Helpers to provide much of the rich functionality we used in the past with ASP.NET Web Forms.  Fortunately, many 3rd party vendors such as Telerik, Infragistics, ComponentOne and many others have provided special controls that can be used in ASP.NET MVC applications.  If you do not have the funding to purchase such 3rd party controls, you can find many suitable replacements to the ASP.NET Web Forms controls in the jQuery UI framework.  The most jarring difference you will find in transitioning over to ASP.NET MVC, is that there is no concept of a server side event handler, therefore, most of your event handling logic will have to be processed and performed on the client side and then posted back to your Controller method.  Once again, performing actions such as Validation can be facilitated through use of the jQuery Validation framework.   

Now, as for Model Binding, the Model is used as the fundamental method for providing data binding functionality in ASP.NET MVC Views.  Instead, of using Data Sources as we traditionally used in ASP.NET Web Forms, we are using these new sources of data called "Models".

Models (Data Binding)

Models are essentially classes that can hold the structure of your data.  You can use Models as "ViewModels" which are basically transformation containers that differentiate between your existing database structure and the structure you actually need to present in your View or they can directly be Entity Framework classes.  Depending on your requirements, you can use a mixture of the two to perform your "Model Binding".  

As you have already probably guessed, you can no longer use things such as SqlDataSource controls in your Views because this would thereby cause your Views to be tightly coupled to your data or your data access methodology.  Therefore, Views are instead bound to Models which makes your retrieval of data for presentation independent and more loosely coupled.  After all, the whole point of using the ASP.NET MVC architecture is to provide a more flexible and loosely coupled application that makes it easier to Unit Test the individual components of your application rather than the very typical tightly coupled applications we developed using ASP.NET Web Forms technology.  

Models can either be stored directly in the Models folder in your ASP.NET MVC solution structure or they can optionally be created as a separate .NET Class Library assembly and subsequently referenced in your project.

Controlllers (ASP.NET Code Behind Files)

Controllers are essentially where all the magic happens.  As stated above, you will typically have at least 2 methods in your Controllers decorated with the [HttpGet] and [HttpPut] attributes.  Of course, you can have more methods in your Controller that are responsible for forming the business logic for your views in the form of various private or protected methods, but the only 2 methods used to build and return the View are the ones decorated with the [HttpGet] and [HttpPut] attributes.

Controllers are essentially responsible for putting everything together and returning everything back to the View.  If you need to do any sort of data access to populate your Model classes, you will perform all of these operations inside of the Controller.  You can do any type of Data Access that you want in your Controller in order to populate your Model classes, however, more typically you will see Entity Framework and LINQ queries used in order to populate these Model classes.  

In your Controller methods, you can either return a View directly (no Model binding) or you can return a View and pass the entire model object back to the View (Model binding).  In addition, you can do something that was typically difficult using traditional ASP.NET Web Forms technology--you can pass an entire object back from a View (typically done in the [HttpPut] Controller method).  


So how do you return a View in a Controller method?

Very simply--either return View(); or return View(model);  


Also, in your Controller methods, you can right click on a Controller method and create a View using the Visual Studio.NET IDE.  You can create MVC views that are Empty or you can use the Scaffolding features in ASP.NET MVC to allow Views to be created with most of the functionality that you need such as Display, Create, Edit and Delete functionality.

Scaffolding is the process of binding your View to a particular Model.  This can either be an Entity Framework class or it can also be a ViewModel that you have created.  The Scaffolding framework will then generate all of the necessary code in your ASP.NET MVC View to perform all of the various actions that are needed to provide the functionality you selected when creating the View.  Scaffolding makes the generation of rich functionality in your ASP.NET MVC web application very quick and easy.

You may be familiar with the concept of Scaffolding in ASP.NET Web Forms through the use of Web Server Controls and data source controls such as the SqlDataSource control which provided automatic add, update and delete functionality through configuration of the SqlDataSource control along with the Web Server control (such as the GridView control).

That is all there really is to it!  Of course, there are many intricate details regarding the use of ASP.NET MVC including things that I have not discussed such as Layout views (Master Pages) and Partial Views (User Controls), but hopefully the basic understanding should help put you well on your way to developing with ASP.NET MVC!

Happy coding!!