Showing posts with label ADFS. Show all posts

Friday, December 16, 2016

Changes to ADFS in Windows Server 2016

With the release of Windows Server 2016, as with earlier releases of ADFS, Microsoft has made significant updates to the functionality and capabilities available with ADFS.

Previously, with the release of Windows Server 2012 R2, Microsoft released support for OAuth as well as several other features in ADFS 3.0.  Now, with the release of Windows Server 2016, the list of new features continues to grow.

One of the major updates to this release of ADFS has to deal with customizing the sign-in/authentication process.  ADFS 3.0 allowed some basic customization of the login/sign-in screen, but with ADFS in Windows Server 2016, the administrators are given nearly full-control of customizing this screen.

You can read about the changes and new features of ADFS in Windows Server 2016 here: https://technet.microsoft.com/en-us/windows-server-docs/identity/ad-fs/overview/whats-new-active-directory-federation-services-windows-server-2016

Thursday, October 8, 2015

ADFS support coming to SQL Server 2016!

If you have used any version of SQL Server Analysis Services or Reporting Services in the past, you may already be well aware of the fact that neither of theses services currently support integration with ADFS (Active Directory Federation Services).

However, with the release of SQL Server 2016, ADFS support will finally be coming to SQL Server!

If you track this Connect feedback item (https://connect.microsoft.com/SQLServer/feedback/details/1340165/provide-adfs-support-for-ssas-and-ssrs), you will see the comments from Microsoft:

Thanks for your feedback. ADFS support, aka claim authentication, is a frequently requested feature. It'll come some time after SQL Server 2016 ships. 

So Microsoft is offering yet another reason for us to upgrade our existing installations of SQL Server 2012 and SQL Server 2014 to SQL Server 2016!

If you are like me, you will be eagerly anticipating this capability since it will provide true SSO support for integration with several Microsoft products such as SharePoint, Dynamics CRM and Project Server.  If Team Foundation Server 2015 also adds support for ADFS, that will sweeten the deal even further! 

Monday, March 16, 2015

Setting up an ASP.NET MVC or ASP.NET Web API application with ADFS

With previously releases of Visual Studio, it was relatively difficult to set up integration with ADFS and required an intricate knowledge of Windows Identity Foundation, Claims-based Identity, WCF and SAML Authorization Tokens etc.

Fortunately, with the release of Visual Studio 2013, it is a relatively simple process to set up your application to be authenticated against ADFS (presumably ADFS v. 2.0).

Here is an article from Vittorio Bertocci (one of the primary developers on the original Windows Identity Foundation project) on how to set this up readily in Visual Studio 2013 with either ASP.NET MVC or ASP.NET Web API:

http://www.cloudidentity.com/blog/2013/10/25/securing-a-web-api-with-adfs-on-ws2012-r2-got-even-easier/

http://www.cloudidentity.com/blog/2014/02/12/use-the-on-premises-organizational-authentication-option-adfs-with-asp-net-in-visual-studio-2013/

http://www.cloudidentity.com/blog/2013/07/30/securing-a-web-api-with-windows-server-2012-r2-adfs-and-katana/

As you read over and review the article, however, there are some missing and unclear points about how to set up your Visual Studio project.  For example, the FederationMetadata.xml endpoint is a value that you will get from your Administrator, but what if you set up ADFS yourself?

Well, the default endpoint will always be in the following format:

https://<servername>/federationmetadata/2007-06/federationmetadata.xml

Therefore, if you set up your own ADFS instance, this will always be the endpoint (substitute your own ADFS Server Name).

Finally, how do you manage testing the "Logout" functionality??

Well, as it turns out, there is no "Logout" functionality in the ASP.NET MVC application when you set it up with ADFS Authentication!!!

Instead, you have to create a hyperlink to provide this functionality yourself within the ASP.NET MVC application which will basically direct you to this Url: https://<servername>/adfs/ls/?wa=wsignout1.0

Alternatively, you can simply delete the ADFS Cookie from your browser.

In addition, if you want to add support for ADFS with your ASP.NET Web API application, you will encounter the following notification:


Therefore, if you have any ADFS infrastructure older than Windows Server 2012 R2, the integration with ADFS and Web API will NOT WORK!

When attempting to authenticate your ASP.NET Web API application with an older version of ADFS, you may get the following error message:   


"An error occurred while sending the request"

If you have secured your ASP.NET MVC Web Application correctly, then when you attempt to access your ASP.NET MVC Web Application, you will see a screen similar to the following:


If you have set up your ASP.NET Web API Web Application correctly, then when you attempt to access the Web API route directly, you will get an error message like this:


Troubleshooting ADFS Authentication with ASP.NET MVC

If you are using ADFS to secure your ASP.NET MVC Web Application, you may encounter some issues when you are securing your ASP.NET MVC Web Application even after following this article: http://www.cloudidentity.com/blog/2014/02/12/use-the-on-premises-organizational-authentication-option-adfs-with-asp-net-in-visual-studio-2013/

First of all, if you have the incorrect Realm configured in ADFS, you may encounter an error such as the following:


In order to resolve this, you need to make sure that the ida:Realm value that you have configured in your Web.config file matches the Relying Party Trust Identifier that you have configured in ADFS.

Next, if you attempt to log into your application using Internet Explorer, you may hit an endless loop of Windows Authentication prompts:


Unfortunately, I am at a loss on how to solve this particular issue since it seems specific to Internet Explorer because other browsers seem to work just fine:


When you attempt to log into ADFS, make sure that you sign in using the required login format:


If everything works correctly, you will be directed to the Home Page of your ASP.NET MVC Web Application:


Set up and install Active Directory Federation Services 3.0

I was recently reading up on Active Directory Federation Services and though I had thought that no major updates to ADFS had been made in a long time, I was wrong!

As it turns out, ADFS was updated to v. 2.1 with the release of Windows Server 2012 and was subsequently refreshed to ADFS v. 3.0 with the release of Windows Server 2012 R2!!

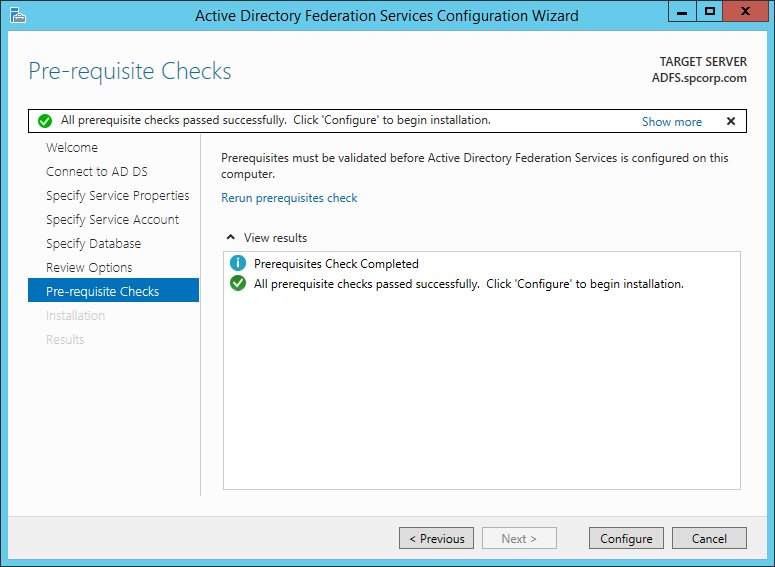
If you take a look at the following screenshots, you will see that the overall installation process for ADFS v. 3.0 has significantly improved over prior releases of ADFS:


As you can tell, the ability to select an SSL Certificate as well as choose between the Windows Internal Database or a SQL Server database are welcome improvements to the installation and configuration of ADFS v. 3.0.

When I was originally configuring ADFS, I decided to set up the Federation Service Name as the exact same name as my ADFS Server resulting in the following error message:

The SPN required for this Federation Service is already set on another Active Directory account.  Choose a different Federation Service name and try again.

I had originally used Internet Information Service's Manager "Create Self-Signed Certificate" feature to create a Self-Signed Certificate.   Of course, this automatically resolves the local SSL Certificate to the computer name resulting in the SPN Conflict Error Message displayed above.

I resolved this as I have in the past by simply using SelfSSL7: http://blogs.iis.net/thomad/archive/2010/04/16/setting-up-ssl-made-easy.aspx

Once I generated my desired Federation Service name, I re-installed ADFS and saw these dialogs instead:


You can then navigate to the location of your ADFS Server and you should see a screen similar to this:


That should be all there is to it!!

This is another great article on setting up ADFS v. 3.0 which covers how to connect it to Office 365:  http://blogs.catapultsystems.com/smcneill/archive/2014/01/04/setting-up-adfs-3-0-server-2012-r2-for-office-365.aspx

Thursday, May 16, 2013

Incoming claim types do not include Claim Type... error message in SharePoint 2010

I was working with my SharePoint development environment and I had to add new Claim Mappings to my SharePoint Server based on some new Claims that I was sending from ADFS.

One of my options was to completely remove the SP-TrustedIdentityTokenIssuer and then completely re-create it with the new Claim Mappings, but that was a bit of a hassle, so I searched for other ways to simply add new Claim Mappings.

I found a partial answer here: http://blogs.dirteam.com/blogs/tomek/archive/2010/07/14/adding-claim-mapping-to-existing-provider-in-sps-2010-part-deux.aspx

However, as soon as I followed the instructions that were provided in the article, I received the following error message: Add-SPClaimTypeMapping: Incoming claim types do not include claim type 'http://schemas.xmlsoap.org/claims/Group

Interestingly enough, this was the same error message the article was attempting to solve!

Fortunately, I came across this other article which offered a complete solution: http://www.theidentityguy.com/articles/2010/10/19/adding-claims-to-an-existing-token-issuer-in-sharepoint-2010.html

The key point to note is that you have to add the Claim Type to the TrustedIdentityTokenIssuer 1st, ONLY THEN you can add the Claim Type Mapping!!

 $SPTrustedIdp = Get-SPTrustedIdentityTokenIssuer "sts"  
 $SPTrustedIdp.ClaimTypes.Add("http://schemas.xmlsoap.org/claims/Group")  
 $SPTrustedIdp.Update()  

 
 $GroupClaimType = "http://schemas.xmlsoap.org/claims/Group"  
 $groupClaim = New-SPClaimTypeMapping -IncomingClaimType $GroupClaimType -IncomingClaimTypeDisplayName "Group" -LocalClaimType $GroupClaimType  
 Add-SPClaimTypeMapping -Identity $groupClaim -TrustedIdentityTokenIssuer $SPTrustedIdp  

Tuesday, May 14, 2013

Using the ADFS FedAuth Token programmatically through the SharePoint Client Object Model

If you are using the SharePoint Client Object Model along with Active Directory Federation Services (ADFS), you may encounter numerous hurdles or obstacles when attempting to interact with SharePoint:

First of all, since you are using Claims-based Authentication, the standard Windows/NTLM Authentication model will no longer work (and is not quite as straightforward).  Therefore, you will need to follow an article similar to the following:

Remote Authentication in SharePoint Online Using the Client Object Model
http://code.msdn.microsoft.com/Remote-Authentication-in-b7b6f43c

However, the problem with this code is that it prompts you for your login credentials each time you attempt to access SharePoint.

But, what if you want to generate the FedAuth Token programmatically without a login prompt?

Well, you can do that as well, thanks to an article by Steve Peschka described here:

Using the Client Object Model with a Claims Based Auth Site in SharePoint 2010http://blogs.technet.com/b/speschka/archive/2010/06/04/using-the-client-object-model-with-a-claims-based-auth-site-in-sharepoint-2010.aspx

As you will see from the above article, you will actually need to enable a new Endpoint on your ADFS Server in order to be able to call ADFS directly to generate the FedAuth token for you.

  1. Open the AD FS 2.0 Management application
  2. Expand the Service node and click on the Endpoints node
  3. Right-click on the /adfs/services/trust/13/windowstransport node and click on Enable on the shortcut menu
  4. Restart the AD FS 2.0 Windows Service (from the Services Control Panel)
The one major thing lacking in Steve Peschka's code, though, is the ability to utilize custom login credentials. Fortunately, that is relatively easy to accomplish:

 ctx.Credentials = new NetworkCredential(UserName, Password, Domain);  

That is all there is to it!

Happy Coding!!

Thursday, March 7, 2013

Testing an ADFS Installation without SharePoint

If you are planning a deployment of SharePoint with Claims-based authentication using ADFS (Active Directory Federation Services), chances are you will want to set up ADFS on a separate server and verify that it is working properly before you configure it to work with SharePoint.

Normally, you would have to set up a test application such as an ASP.NET Web Application using the Windows Identity Foundation SDK to verify the functionality and integration of ADFS.

Fortunately, there is a little known feature in ADFS once it is installed which allows you to test an installation of ADFS without an application!

This feature is in the form of a page called IdpInitiatedSignOn.aspx which is located in the root of the /adfs/ls directory.  Therefore, it can be found at a Url similar to the following https://<adfs fqdn>/adfs/ls/IdpInitiatedSignOn.aspx

You can find this page by browsing the Content View in IIS to locate the name of the page:


If you want to simplify your life further, you can turn on FormsSignIn and make it the default authentication type in the web.config file (located beneath C:\inetpub\adfs\ls).  By default, the FormsSignIn.aspx element is not the first element in the web.config file.  You can simply cut and paste it as the first line below localAuthenticationTypes as shown in the screenshot below:


Once you have everything configured, you should be able to log into the IdpInitiatedSignOn.aspx page and see a page similar to the following:


If you are able to successfully log into your ADFS instance using your Windows Active Directory credentials, you have correctly setup and configured your ADFS installation and can proceed with integrating ADFS with SharePoint as a Trusted Identity Provider!


Congratulations!!


Tuesday, January 29, 2013

ADFS v. 2.0 Training on PluralSight

PluralSight (http://www.pluralsight.com) offers a variety of ADFS v. 2.0 training as part of their Full Library catalog.

The Full Library catalog requires a monthly or annual subscription but the material on ADFS v. 2.0, Windows Identity Foundation as well as a wide variety of other assorted topics related to development are well worth the cost!


Friday, September 7, 2012

Configuring ADFS v. 2.0 on Windows Server 2012

With the release of Windows Server 2012, ADFS v. 2.0 is now built into the OS.  You can simply add ADFS v. 2.0 by adding roles/features through Server Manager.

However, you will notice that the ADFS v. 2.0 Configuration Wizard has been slightly updated and refreshed with the release of Windows Server 2012.

Screenshots from the updated ADFS v. 2.0 Configuration Wizard in Windows Server 2012 are below:


Tuesday, July 10, 2012

Correcting Relying Party Trusts in ADFS v. 2.0

If you are a relative newbie to using ADFS v. 2.0 (as most of us are), odds are that you won't get your configuration of ADFS v.2 .0 just right the very first time.

Fortunately, if you have a working installation of ADFS v. 2.0 but you misconfigured your Relying Party Trusts information, that is relatively easy to fix.

First of all, why might you need to re-configure your Relying Party Trust?

If you are building a development/test machine, there is a good chance that you may have configured ADFS to rely on a computer or machine name when in fact a FQDN (Fully Qualified Domain Name) is in order.  If there are mismatches between what is configured in SharePoint, IIS and ADFS, these issues will cause you all types of grief.

However, as I stated earlier, this can be easily modified as follows:


  1. Open your ADFS 2.0 Management Console
  2. Locate the Trust Relationships folder and expand it to display Relying Party Trusts
  3. Once Relying Party Trusts has been selected, you should see all of your available Relying Party Trusts
  4. Right click on the name of the Relying Party Trust you wish to modify and select Properties
  5. Once the Properties window opens, you can click on the Identifiers tab
  6. There you will be able to view all of the Identifiers you have configured for your Relying Party Trust
  7. Since there is no Edit option available, you will have to remove an existing Url and then re-add it back to the list of Relying party identifiers.
  8. For a Relying Party Trust such as SharePoint, modify the Url, but always make sure that it ends with /_trust/
  9. Now click over to the Endpoints tab
  10. Select the WS-Federation Passive Endpoint you configured and click on the Edit button
  11. Here you can modify the Url once again.  As before, if you are working with SharePoint, make sure that the Url ends with /_trust/
  12. Click the OK button to close the Edit Endpoint dialog
  13. Click OK once more to close out of the Relying Party Trust Properties dialog


NOTE: If you are working with SharePoint, make sure that your Alternate Access Mappings coincide with the Url you have configured in ADFS.  (You can check this through Central Administration-->Application Management-->Configure alternate access mappings)

If all of your changes in ADFS were applied successfully, many of the errors messages and security issues you encountered should now go away!!


Friday, June 29, 2012

Uninstalling and re-installing ADFS v. 2.0

I recently screwed up my ADFS v. 2.0 installation on a test environment by using a bad SSL (Service Communications) certificate.  Of course, the UI nor PowerShell offered any help in fixing this issue, therefore, I had to resort to completely uninstalling and re-installing ADFS v. 2.0.  It is recommended that you follow the steps below to perform a COMPLETE cleanup of ADFS. 

If you forget to perform one of the cleanup operations such as deleting the application directories from the IIS website, you will receive an error message similar to the following:


  1. Go into Control Panel-->Programs
  2. Uninstall a Program
  3. Click on View Installed Updates in the left hand pane
  4. Click on Active Directory Federation Services 2.0 listed under the Windows heading
  5. Click the Uninstall button
  6. When prompted for the confirmation, click Yes
  7. Click Restart Later to postpone restarting the computer
  8. Now it is time to clean up the IIS installation of ADFS
    • Open up a Command Prompt window
    • Type the following command at the command prompt: C:\Windows\System32\inetsrv\appcmd delete app “Default Web Site/adfs”
    • If the command was successful, it should indicate that the Web App was deleted such as the following message: APP object "Default Web Site/adfs" deleted
    • Type the following command at the command prompt: C:\Windows\System32\inetsrv\appcmd delete app “Default Web Site/adfs/ls”
    • If the command was successful, it should indicate that the Web App was deleted such as the following message: APP object "Default Web Site/adfs/ls" deleted
    •  Delete the ADFS folder from the file system (usually under C:\inetpub\adfs)
  9. Now you should be able to restart the computer
  10. After re-starting the computer, you can proceed with re-installing ADFS (and perhaps Update Rollup 2).
  11. Once ADFS has been re-installed, you can proceed with the ADFS Configuration Wizard once more
  12. Proceed through the ADFS Configuration Wizard as before
  13. When you get to the step where you have to delete the existing ADFS database, check the checkbox to "Delete database"
  14. If everything works correctly, the ADFS Configuration wizard should complete successfully (with perhaps some warnings).

Thursday, June 28, 2012

Be careful with using SetSPN in conjunction with ADFS

I was recently messing around with ADFS and changing configuration settings and so forth based on this article:  http://social.technet.microsoft.com/wiki/contents/articles/ad-fs-2-0-how-to-change-the-federation-service-name.aspx and the corresponding SetSPN article:  http://social.technet.microsoft.com/wiki/contents/articles/ad-fs-2-0-how-to-configure-the-spn-serviceprincipalname-for-the-service-account.aspx

Of course, when I was making these changes, I was under the impression that the changes would be localized to ADFS--boy was I WRONG!!

After making these changes, silly me, I decided to go and run iisreset.  Suddenly, I could no longer access Central Administration and the Application Pool for Central Admin would not start.  So, SharePoint and Windows being what it is, I decided to re-boot the server to see if that would alleviate the problem.  

Of course, when I tried to log back into the system, I got the following error message: 

"The security database on the server does not have a computer account for this workstation trust relationship"

Unfortunately, since I was running a domain controller and ADFS on the same server, this left me with no ability to get back into the server to fix the issue!!  

Thankfully, the installation was on a VM and I had made a recent backup.  So all I had to do was simply restore the VM from a backup.  

However, when working with ADFS and SetSPN--Be WARNED of the consequences of your actions!!

Friday, June 22, 2012

ADFS v. 2.0 and Windows Server 2012

If you currently use ADFS v. 2.0, you should be excited to know that ADFS v. 2.0 will be built into the next version of Windows Server--namely Windows Server 2012.  

Windows Server 2012 boasts new ease of use for setting up and configuring ADFS v. 2.0 as well as support for some of the new features in Windows Server 2012 such as Dynamic Access Control.

You can read more details here: http://technet.microsoft.com/en-us/library/hh831502

Monday, March 12, 2012

Unable to authenticate using SharePoint 2010 SP1 and ADFS

I recently encountered an issue whereby I was unable to authenticate against my SharePoint 2010 SP1 installation with ADFS v. 2.0. 

I had followed each and every single step to properly configure my ADFS v. 2.0 installation in conjunction with my SharePoint 2010 SP1 installation, but I continued to receive an "Access Denied" error message. 

I could verify that the authentication process was being redirected to ADFS v. 2.0 since I was getting the ADFS v. 2.0 authentication prompt and when I hit my SharePoint site, I saw that it was receiving the Claims from ADFS in the form my configured e-mail address.

So, after spending several hours on the phone with Microsoft support, we were able to determine that my User Policy screen did not look correct.  It was missing the "SAML Provider" option amongst the list of available Claims providers!

This is how the User Policy screen SHOULD look like:


Therefore, based on some further investigation, Microsoft determined that I needed to apply the June 2011 CU (minimally) to resolve this issue.   Apparently, even though SharePoint 2010 SP1 can be downloaded directly from MSDN, this version is insufficient to have a completely working installation using Claims-based Authentication.

You can download the June 2011 CU (and later cumulative updates) from here:
http://technet.microsoft.com/en-us/sharepoint/ff800847

Needless to say, after applying the SharePoint Foundation 2010 and SharePoint Server 2010 June 2011 CU, my SharePoint site was able to successfully authenticate using ADFS!!

Interestingly enough, I just recently found this article which describes this issue (of course, after I have already solved the issue with MSDN Support):
http://blogs.technet.com/b/speschka/archive/2011/07/19/saml-alert-for-sharepoint-2010-if-you-apply-sp1-follow-up-with-june-cu.aspx

So, if you are setting up an installation of SharePoint 2010 for the first time, make sure that you install AT LEAST 1 Cumulative Update after the application of SP1 or you will probably face the same problem I encountered!

Tuesday, March 6, 2012

Installing and configuring ADFS v. 2.0 for Developers

In order to configure and install ADFS v.2 0, you will first need to set up a domain controller just as you did with ADFS v. 1.0.

For instructions on how to set up a domain controller in a virtual machine, you can check out this earlier post: http://samirvaidya.blogspot.com/2011/09/setting-up-domain-controller-in-virtual.html

After you have set up and configured your domain controller, you will need to download the following components:

  1. ADFS v. 2.0 RTW: http://www.microsoft.com/download/en/details.aspx?id=10909
  2. ADFS v. 2.0 Update Rollup 2: http://support.microsoft.com/kb/2681584
  3. Windows Identity Foundation Runtime: http://www.microsoft.com/download/en/details.aspx?id=17331
Once you have downloaded the necessary components, you will need to install them.  Since Windows Identity Foundation Runtime is a prerequisite for ADFS v. 2.0, you need to install this PRIOR to installing ADFS v. 2.0.

Many of these steps are similar to what has been described in this article: http://www.sysadminsblog.com/microsoft/installing-and-configuring-adfs-2-0/

However, I have made some slight modifications for testing/development purposes.

  1. Instead of using a 3rd party SSL Certificate, simply create a Self-Signed Certificate from within the IIS Manager Console and assign the SSL Certificate Bindings to the Default Web Site.  Alternatively, if you do not want to deal with error messages about the SSL Certificate in the browser, you can instead use SelfSSL7: http://blogs.iis.net/thomad/archive/2010/04/16/setting-up-ssl-made-easy.aspx
  2. Instead of creating a New Federation server Farm, simply create a Stand-alone federation Server.
  3. When proceeding through the Active Directory Federation Server Wizard, you will be allowed to select or view the Website with the SSL Certificate that you just configured.
  4. If you will also be installing SharePoint 2010 on the same machine as ADFS, you will need to look at this article: http://support.microsoft.com/kb/896861.  Since the SharePoint site will also need to be on a secured IIS Web Site, you will have to assign it a different host header name than the server's name.  If the loop back check has not been disabled, you will be unable to render the SharePoint site using the different host name.
  5. If you are planning on using ADFS in conjunction with SharePoint, you may also want to look at the advice in this article: http://blogs.technet.com/b/speschka/archive/2011/07/13/you-may-experience-slowness-when-using-saml-claims-with-sharepoint-2010.aspx
  6. If everything works correctly, you will have successfully installed and configured ADFS v. 2.0!


If you are planning to now use your ADFS v. 2.0 installation for a server installation of SharePoint 2010, you can follow the instructions outlined in this article: http://blogs.technet.com/b/speschka/archive/2010/07/30/configuring-sharepoint-2010-and-adfs-v2-end-to-end.aspx

If you are considering using Windows Server 2012 for your ADFS v. 2.0 deployment with SharePoint 2010, you can follow this article: http://social.technet.microsoft.com/wiki/contents/articles/11135.sharepoint-2010-how-to-install-and-configure-adfs-for-sharepoint-2010-on-windows-server-8-en-us.aspx

Friday, October 7, 2011

ADFS v. 2.0 and Windows Server 2008 R2

If you need to configure ADFS v. 2.0 for use in Claims-based authentication scenarios, interestingly enough, ADFS v. 2.0 DOES NOT come pre-installed with Windows Server 2008 R2--even after the release of SP1.

Therefore, you will not be able to install ADFS as part of the Server Roles that come with Server Manager.  Instead, you will have to separately download the release of ADFS v. 2.0 and install and configure it separately.

You can download the release of ADFS v. 2.0 from here: http://www.microsoft.com/download/en/details.aspx?id=10909

There is also an update rollup for ADFS v. 2.0 available which can be downloaded from here: http://support.microsoft.com/kb/2607496

In addition, this is an excellent article on configuring ADFS v. 2.0: http://www.sysadminsblog.com/microsoft/installing-and-configuring-adfs-2-0/

Thursday, October 6, 2011

Installing and configuring ADFS v. 1.0

If you need to install and configure ADFS (Active Directory Federation Services) to use in scenarios such as Claims Based Authentication, you will need to know several things before installing and configuring ADFS.

  1. You will need to install and configure a Domain Controller/Active Directory prior to installing ADFS.  If you are simply setting up a test environment, you can install the domain controller with Active Directory on the same server as your ADFS installation.
  2. Active Directory requires SSL certificates to be installed in IIS in order to function properly.  When stepping through the ADFS installation wizard, you will have the option to create self-signed certificates. 
  3. After re-booting from an installation of ADFS, you will get an error message/error icon next to the ADFS role in Server Manager.  This is caused by the usage of the self-signed SSL certificates.  In order to resolve this issue, you will have to do the following:
    • Open up the IIS Manager console
    • Open up Server Certificates
    • For the individual Server Certificates that were created through the ADFS installation wizard, right click on the certificates and select View.
    • Once you are able to view the certificate, click on the Details tab.
    • On the Details tab, you should see a button on the bottom of the screen which states "Copy to File"
    • Click on the Copy to File button to export the server certificate.
    • Follow the wizard dialogs to export and save the server certificate.
    • Once both certificates have been successfully exported, you can right click on the certificates and select "Install Certificate"
    • When proceeding through the certificate installation dialogs, select the radio button for "Place all certificates in the following store"
    • You will then want to browse to the location of the "Trusted Root Certification Authorities"
    • Complete the Install Certificate wizard to store the server certificate in this location. 
    • Repeat this step for the other server certificate as well.
    • Once again re-boot the server.
    • When you open up Server Manager after the re-boot, the error message/error icon next to the ADFS role should have disappeared.
  4. Verify that you can now successfully access the following Url in a browser without getting a server certificate error message: https://<fully qualified server Url>/adfs/fs/federationserverservice.asmx
  5. If you are able to navigate to this Url and view the available methods on the Web Service, you have successfully configured ADFS for use!