Showing posts with label IIS. Show all posts

Tuesday, December 13, 2016

Setting ACLs on Website directories using PowerShell

One of the extremely common tasks I have to perform whenever I set up a website or virtual directory/application in IIS is that I have to also set up folder/directory permissions on the newly created directory as well.

This can be time consuming and error prone, especially if you have to set up numerous directories either on a single web server or multiple web servers.

That is why I heavily rely on PowerShell to help me accomplish this task!

For a primer on just how to accomplish this using PowerShell, you can check out this article: http://www.tomsitpro.com/articles/powershell-manage-file-system-acl,2-837.html

Of course, my needs are targeted towards IIS website directories in particular, so I have modified the original script to suit my needs.

You can check out my version of the PowerShell script:


Saturday, December 10, 2016

Installing a Wildcard SSL Certificate to IIS

If you ever have the need to install a Wildcard SSL Certificate, you may encounter a problem whereby the SSL Certificate is generated with a particular CSR (Certificate Request), but other servers will inevitably generate different CSRs (Certificate Requests)!

Therefore, how do you install the same Wildcard SSL certificate to MULTIPLE SERVERS?

Well, in this case, you need to EXPORT the SSL Certificate as a .pfx file and then subsequently import the SSL certificate on subsequent servers in order to be able to utilize it without re-generating separate certificate requests.

You can find instructions for backing up/exporting to a .pfx file and then subsequently importing the .pfx file here: https://www.digicert.com/ssl-support/pfx-import-export-iis-8.htm

Thursday, August 11, 2016

Web Deploy v. 3.6 vs. 3.5

Microsoft has released Web Deploy v. 3.6 some time ago, and you can download this latest release from here: https://www.microsoft.com/en-us/download/details.aspx?id=43717

The earlier release of Web Deploy v. 3.5 can be downloaded from here: https://www.microsoft.com/en-us/download/details.aspx?id=39277

However, after installing Web Deploy v. 3.6, I noticed a major discrepancy in the integration with IIS!

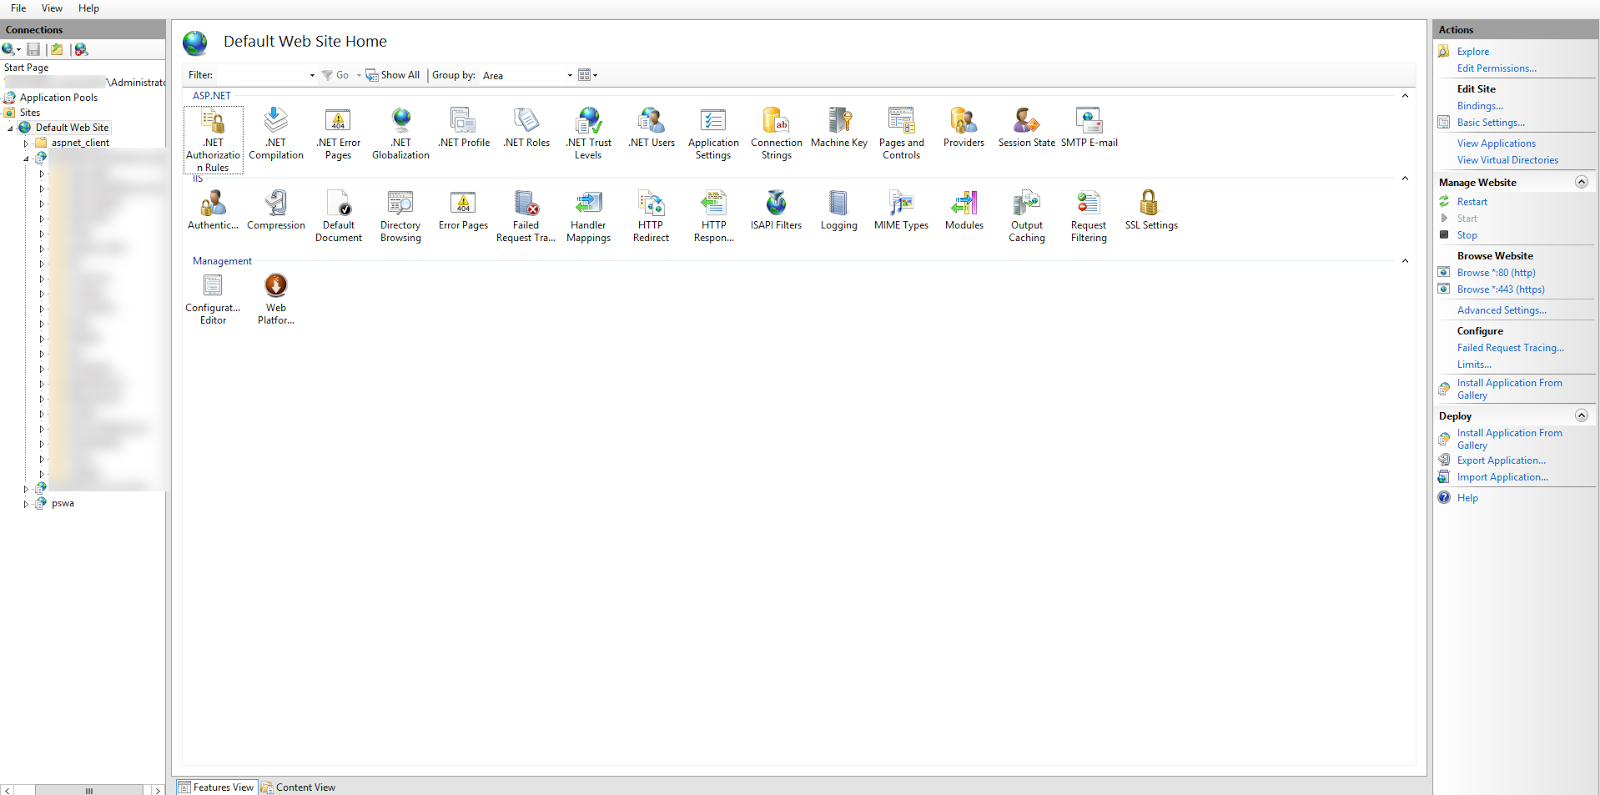
When I install Web Deploy v. 3.5, I get the following User Interface in IIS:


However, after installing Web Deploy v. 3.6, these options to "Import Server or Site Package" or "Export Server Package" are not available!


In addition, the options for "Export Application" or "Import Application" are also not available!

Instead, when I install Web Deploy v. 3.6, the only option available in IIS is "Install Application from Gallery"!!


Needless to say, I am sticking with Web Deploy v. 3.5 for the foreseeable future until this issue is resolved!!

Saturday, July 2, 2016

Creating Web Applications in IIS using PowerShell

I am a big fan of PowerShell and have been looking for ways to script out common IIS Administration tasks using PowerShell and there have been a number of methods provided in the past that made it reasonably difficult to create Web Applications in IIS using PowerShell.

However, I came across an article recently that makes this task a piece of cake!  https://technet.microsoft.com/en-us/library/hh867877(v=wps.630).aspx

This resulted in me creating the following PowerShell script:


This worked like a charm! Now I can easily automate nearly any IIS Administration task! Woo hoo!

Friday, February 12, 2016

Updating IIS SSL Certificate Bindings using PowerShell

I recently had a requirement to use PowerShell to automatically update the SSL Certificate bindings in IIS so I started hunting around for scripts that would help me accomplish this.

Initially, I encountered this script which provided some insight on how to accomplish this:  http://www.iis.net/learn/manage/powershell/powershell-snap-in-configuring-ssl-with-the-iis-powershell-snap-in

Unfortunately, this article was quite old and outdated and relied on a PowerShell Snap-In which I could not easily determine how to load.

Thankfully, I then came across this much, much NEWER article which is much, much more helpful in determining exactly how to accomplish this task: https://blogs.technet.microsoft.com/heyscriptingguy/2015/03/01/weekend-scripter-use-powershell-to-update-ssl-bindings/

I ended up using this slightly modified version of that PowerShell script to achieve my goals:


[CmdletBinding()]
Param (
 [Parameter(Mandatory = $True, HelpMessage = "Please enter the name of the Web Site")]
 [string]$WebsiteName = "Default Web Site",
 [Parameter(Mandatory = $True, HelpMessage = "Please specify the SSL Port Number")]
 [string]$SSLPort = "443",
 [Parameter(Mandatory = $True, HelpMessage = "Please enter the SSL Certificate Common Name such as *.microsoft.com")]
 [string]$SSLCertSubject
)

Import-Module WebAdministration

Import-Module PKI


function Get-CertificateThumbprint
{
 Param ([string]$CertificateSubject)
 
 $CertThumbprint = (Get-ChildItem -Path cert:\LocalMachine\My -Recurse | Where-Object { $_.Subject -like "CN=$CertificateSubject*" } | Select-Object Thumbprint).Thumbprint
 
 return $CertThumbprint
}


$thumbPrint = Get-CertificateThumbprint -CertificateSubject $SSLCertSubject
$IPAddress = "0.0.0.0"

Clear-Host

New-WebBinding -Name $WebsiteName -IPAddress "*" -Port $SSLPort -Protocol "https"

Get-Item -Path "cert:\LocalMachine\My\$thumbPrint" | New-Item -Path "IIS:\SSLBindings\$IPAddress!$SSLPort"

Wednesday, November 25, 2015

Installing Windows Features dynamically using PowerShell

I recently had to install a set of Windows IIS features on a Windows Server 2008 R2 box, when I was suddenly faced with this error message:

"The all option is not recognized in this context."

I had been using this article for DISM to execute my commands in the past on Windows Server 2012 and Windows Server 2012 R2: https://technet.microsoft.com/en-us/library/hh824822.aspx 

Even though the article says that it applies to Windows Server 2008 R2, according to the error message, this does not appear to work!

Therefore, I decided to write my own custom PowerShell script that would allow me to "dynamically" install Windows Features without manually having to re-write my existing Windows Feature command for different platforms.

This is finally what I came up with:

$IISFeatures = @("NetFx3", "IIS-ASPNET", "IIS-NetFxExtensibility", "IIS-ApplicationDevelopment","IIS-WebServer", "IIS-WebServerRole", "IIS-DefaultDocument", "IIS-CommonHttpFeatures", "IIS-ISAPIFilter", "IIS-ISAPIExtensions", "IIS-NetFxExtensibility", "IIS-RequestFiltering", "IIS-Security")
 
$IISFeatureNames = New-Object System.Collections.ArrayList
 
 
Clear-Host
 
foreach ($feature in $IISFeatures)
{
    $FeatureName = "/FeatureName:" + $feature
    Write-Host $FeatureName
    $IISFeatureNames.Add($FeatureName)
}
 
 
#Dynamically enable the list of features
& DISM /Online /Enable-Feature $IISFeatureNames

When I want to add or install a new Windows Feature, I simply add the name of the Windows Feature to the $IISFeatures array.

You can get a list of available Windows Features by running this command:

dism /online /get-features | more

Tuesday, September 29, 2015

SHA1 Self Signed Certificates in IIS

If you have ever created a Self Signed Certificate in IIS (or using SelfSSL7) you may discover that the Self Signed Certificate you created only supports SHA1!!


However, as you may well know, SHA1 is being deprecated in favor of SHA256 certificates (http://blogs.technet.com/b/pki/archive/2013/11/12/sha1-deprecation-policy.aspx) and if you are using an SHA1 SSL certificate, you may get a browser warning such as the following:


Therefore, in order to avoid using an SHA1 SSL Certificate, you will have to resort to setting up your own hosted Windows Certificate Services which supports SHA256 SSL Certificates.

If you want Windows to support Self Signed SHA256 SSL Certificates, then you should vote for this UserVoice item: https://windowsserver.uservoice.com/forums/310252-iis-and-web-server-role/suggestions/9979233-provide-support-for-sha256-self-signed-certificate


Wednesday, August 26, 2015

Encrypting Configuration Sections in Web.config

If you want to encrypt your Web.config Configuration Sections, then you will definitely want to take a look at these MSDN articles:


How To: Encrypt Configuration Sections in ASP.NET 2.0 Using DPAPI
https://msdn.microsoft.com/en-us/library/ff647398.aspx


How To: Encrypt Configuration Sections in ASP.NET 2.0 Using RSA
https://msdn.microsoft.com/en-us/library/ms998283.aspx

Tuesday, August 18, 2015

Configuring IIS Logging

If you have ever wanted to try and track down a difficult IIS-related problem, then you will definitely want to leverage IIS Logging.

You can set up IIS Logging rather easily by following these steps:

  1. Open up IIS Manager
  2. Select a website you wish to configure for Logging
  3. On the Features view tab, click on the Logging icon
  4. Specify a location and time interval for the log files
  5. Click on Apply to begin logging your IIS requests
  6. That is all there is to it to begin logging all of your IIS activity that you can later analyze for troubleshooting and diagnostics!


Monday, August 10, 2015

Using SelfSSL7 as an alternative to using IIS Self-Signed Certificates

If you are setting up SSL on your IIS website, you may encounter numerous problems when developing and debugging with the installed SSL Certificate such as this error message: http://samirvaidya.blogspot.com/2015/04/the-remote-certificate-is-invalid.html

Fortunately, there is a better way to use SSL certificates than the Self-Signed Certificate option in IIS which is to use SelfSSL7!

You can download and learn how to use SelfSSL7 here: http://blogs.iis.net/thomad/setting-up-ssl-made-easy

The beauty of using SelfSSL7 is that it automatically adds the SSL Certificate into the Trusted Certificate Store thus removing an extra step required to get an SSL certificate working properly in IIS.

However, drilling down into the Command Line and executing commands is a bit error prone and tedious, therefore, I have created a convenient PowerShell script to accomplish this instead!!

The PowerShell script simply requires the same path information as the command line, but allows the usage of variables to control how the SSL certificate is set up in IIS.

$SelfSSL7 = "C:\SelfSSL7\SelfSSL7.exe"
 
$WebsiteName = "Default Web Site"
 
$CommonName = $env:COMPUTERNAME
 
$LocalHost = "localhost";
 
$ValidityPeriod = "3650"
 
$KeySize = "2048"


Clear-Host
 
$SelfSSLCmd = @"
 
"$SelfSSL7" /Q /T /I "$WebsiteName" /N "cn=$CommonName;cn=$LocalHost"
 
"@
 
Write-Host $SelfSSLCmd
 
& $SelfSSL7 /Q /T /I "$WebsiteName" /N "cn=$CommonName;cn=$LocalHost" /V $ValidityPeriod /K $KeySize | Out-Host


Tuesday, August 4, 2015

Unable to render CSS for an IIS Website/IIS Application

I had recently set up a brand new ASP.NET Web Application in an IIS Website and Application on Windows Server 2012 R2 complete with an SSL certificate and NTFS permissions. 

Once I had everything set up, I attempted to view the website in a browser.  To my surprise, none of the CSS stylesheets were rendering for the site!!

After a tremendous amount of research on the Internet, I discovered that simply assigning the machine IIS_IUSRS group privilege was insufficient to render all static content on the site!

I ALSO had to add the machine IUSR account to the set of NTFS privileges in order to get my CSS to render properly on the site.

Once I did that, my site was working correctly just as I would expect!!

Wednesday, June 3, 2015

IIS vs IIS Express for 32-bit applications

I was recently working on a project where a developer inadvertently added a 32-bit assembly reference to the project.

Of course, the application worked just fine on the developer's machine, however, when it was deployed to the web server, an assembly loading error message was encountered!

Having seen that error message earlier, we immediately recognized that a 32-bit assembly reference had been inadvertently added to the project/solution and since IIS was not configured to run as a 32-bit application, this error message inevitably popped up.

However, we did not understand how it ever worked on the developer's machine!

Well, as it turns out, the developers was using the built-in version of IIS Express that ships with Visual Studio 2013.  Since Visual Studio 2013 itself is a 32-bit application, we assumed it was also using a 32-bit version of IIS Express.

When I ran the application in Visual Studio and looked at Task Manager, our suspicions were confirmed:


The IIS Worked Process clearly indicated that it was a 32-bit process, thereby explaining why the solution worked perfectly on the developer's machine but failed to work when deployed to a full 64-bit version of IIS.

This not only taught us the differences between developing with IIS Express in Visual Studio vs developing with IIS, but also the tremendous importance of having a robust and reliable continuous integration system!!

Friday, April 24, 2015

Setting up and installing Web Deploy for IIS

If you want to simplify your deployments to your IIS Web Servers, you probably want to set them up for Web Deploy.

Unfortunately, by default, Web Deploy is not available with a brand new installation of Windows Server 2012 or Windows Server 2012 R2.

Instead, you have to go ahead and install Web Deploy using the Microsoft Web Platform Installer:


Alternatively, you can download Web Deploy directly from here: http://www.iis.net/downloads/microsoft/web-deploy

Once you have installed Web Deploy (v. 3.5 as of this writing), your Internet Information Services Management Console will look something like this:

You will notice that in the right hand navigation pane, you now have 2 options under the heading Deploy:
  • Export Application
  • Import Application
These operations are pretty much self explanatory.  When you click on Export Application, you get the option to export an existing IIS Application:


Once you have gone through the wizard to export the Application from IIS, you will end up with a deployment package as a .zip file.  You can then consequently import the application on another target IIS Web Server by selecting Import Application:


Using Web Deploy on your IIS Servers greatly simplifies the traditional method of using XCOPY to copy and paste files from one web server to another and manually creating IIS Applications or Virtual Directories.

Now that you know how to use Web Deploy for IIS, this is one more tool you can add to your toolbelt to save you time in your development and deployment operations and processes!


Setting up SSL for Apache Tomcat


Normally if you are using all Microsoft technologies, you will probably only be dealing with applications that deploy to IIS, but there are numerous technologies which target Windows platforms but are still built on Java and therefore deploy to the Apache Tomcat web server.

Common examples of such tools are SAP Business Objects as well as Jetbrains TeamCity.

Therefore, you may encounter a time in your career when you have to apply an SSL certificate to Apache Tomcat.

If you consult the Apache Tomcat documentation, the installation of an SSL certificate for Apache Tomcat seems extremely complex and convoluted: https://tomcat.apache.org/tomcat-6.0-doc/ssl-howto.html

However, fortunately for many of us Windows Administrators, there is a simpler way!

If you are familiar with installing SSL certificates for IIS, you probably are already well aware of how to use .pfx files to install Server Certificates.

Well, this same server certificate can be installed on your Apache Tomcat web server to secure it with SSL!

This article actually does a great job of describing how to set up Apache Tomcat with SSL support: https://support.comodo.com/index.php?/Knowledgebase/Article/View/646/0/tomcat-ssl-connector

Basically, it just involves modifying your server.xml file (located in the conf directory) to something like the following:

<Connector port="443" maxHttpHeaderSize="8192" maxThreads="150" minSpareThreads="25" maxSpareThreads="75" enableLookups="false" disableUploadTimeout="true" acceptCount="100" scheme="https" secure="true" clientAuth="false" sslProtocol="TLS" keystoreFile="conf/your_domain.pfx" keystorePass="your_keystore_password" keystoreType="PKCS12"/>

That is really all there is to it!!

Wednesday, April 1, 2015

Generating a MachineKey for ASP.NET

If you want to share any information (such as Forms Authentication Cookies) across your ASP.NET Applications, you will need to ensure that you use a common MachineKey element across all of your ASP.NET Web Applications. 

Of course, you can use one of the many online MachineKey generators, or you can directly generate your own MachineKey from IIS Manager!

One of the limitations that the online MachineKey generators have is that they only provide a few options for your MachineKey element in terms of validation and encryption.  However, if you use the built-in IIS Management capabilities for generating your MachineKey, you do not have any of these limitations.


Monday, March 9, 2015

Where is the applicationHost.config file for IIS?

On newer versions of IIS (v. 7.0 and later), the applicationHost.config file contains all of the XML values for the IIS configuration.

This can be found at the following location: C:\Windows\System32\inetsrv\config\applicationHost.config

If you are looking for the applicationHost.config for IIS Express, you can find that here:  C:\Users\<User Profile Name>\Documents\IISExpress\config\applicationhost.config


Using the IIS Configuration Editor to Generate Scripts

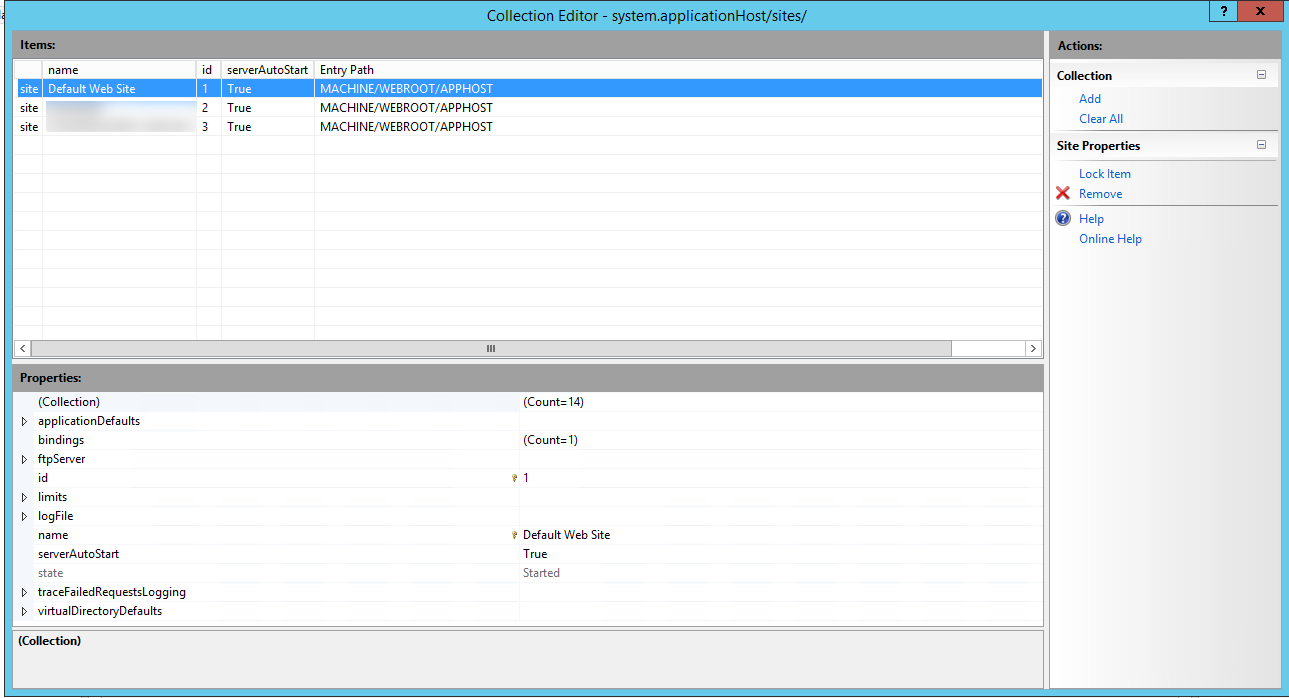
Many people who manage IIS do not know that you can easily figure out how to automate IIS operations using the IIS Configuration Editor which is available in IIS 7.5 and above.

Unfortunately, there are not a lot of articles on the Internet which provide much guidance on how to navigate and perform common operations in IIS using the Configuration Editor.

This article provides some insight into using the Configuration Editor, but does not provide you with performing common operations such as creating Application Pools, Sites and Applications.

http://www.iis.net/learn/manage/managing-your-configuration-settings/editing-collections-with-configuration-editor

This article provides some information about how to create Application Pools, but includes no screenshots so you are a bit lost about how to perform other operations using the IIS Configuration Editor:

http://www.iis.net/learn/manage/managing-your-configuration-settings/using-configuration-editor-generate-scripts

Therefore, here are the detailed steps on how to accomplish this:

  1. Click on the Root Server Name in IIS Manager (the name of your Windows Server)
  2. In Features view, click on the Configuration Editor icon
  3. Click on the Section dropdownlist to select the section  you wish to edit such as applicationPools or sites
  4. If you select sites, you can then view the individual Web Sites and drill into them further to get into the Applications
  5. When you are ready to add a new Application, click on the Add button in the right hand pane
  6. Enter all of the details for your Application such as the Name, ApplicationPool etc.
  7. You will have to go into the Virtual Directory/Application level and specify a Physical Path for the Application.  NOTE: If you forget to do this, the Application will not appear in IIS.
  8. Close out of all of the dialogs you have edited except the main IIS Management Window
  9. In the right hand pane, select "Generate Script" 
  10. This will open a dialog allowing you to select which type of script you want to generate such as C#, PowerShell, JavaScript or Command Line (using AppCmd)
  11. You can then copy and paste this script to the editor of your choice and run it!
  12. Best of all, you can edit this script to your heart's content to customize it for your automation needs in the future!  Awesome!!


Below is a sample PowerShell script that can be used to create an ApplicationPool and Application:

$AppPoolName = "MyAppPool";
$WebSiteName = "MySite";
$ApplicationSiteName = "/MyApplication";
$ApplicationSiteNamePhysicalPath = "E:\Websites\MySite";
$RuntimeVersion = "v4.0";
 
Clear-Host
Add-WebConfigurationProperty -pspath 'MACHINE/WEBROOT/APPHOST'  -filter "system.applicationHost/applicationPools" -name "." -value @{name=$AppPoolName;managedRuntimeVersion=$RuntimeVersion};
Add-WebConfigurationProperty -pspath 'MACHINE/WEBROOT/APPHOST'  -filter "system.applicationHost/sites/site[@name='$WebSiteName']" -name "." -value @{path=$ApplicationSiteName;applicationPool=$AppPoolName};
Add-WebConfigurationProperty -pspath 'MACHINE/WEBROOT/APPHOST'  -filter "system.applicationHost/sites/site[@name='$WebSiteName']/application[@path='$ApplicationSiteName']" -name "." -value @{path='/';physicalPath=$ApplicationSiteNamePhysicalPath};

Tuesday, March 3, 2015

Enabling Windows Authentication in IIS Express

If you need to enable Windows Authentication for your ASP.NET Application and you are using IIS Express (usually when you are using the built-in web server with Visual Studio), then you can edit the applicationhost.config file.

The applicationhost.config file is located in the My Documents\IISExpress\config directory (ex: C:\Users\MyUserName\Documents\IISExpress\config\applicationhost.config)

You can simply locate the location element in your applicationhost.config file representing your ASP.NET Web Application so that the section looks like the following:

<location path="ASPNET.MyWebApp">
       <system.webServer>
           <security>
               <authentication>
                   <windowsAuthentication enabled="true" />
               </authentication>
           </security>
       </system.webServer>
   </location>

That is all there is to it!!


Wednesday, April 23, 2014

Dealing with Trust Issues using Self-Signed Certificates

If you use Self-Signed Certificates to secure your websites in IIS, you probably have received this dreaded message in Internet Explorer at least once:


Well, fortunately, you can get rid of this client error message relatively easily by following these steps:


  1. Click on the Internet Explorer Toolbar to View the Certificate
  2. Follow the steps to Install the Certificate on your Local Machine
  3. When prompted for the location to store the Certificate, select "Trusted Root Certification Authorities" 
  4. Once you have imported the certificate, you will probably have to restart Internet Explorer
  5. Now when you browse to the website, you should no longer receive the Certificate error message! 


Monday, November 11, 2013

FileNotFoundException while using Microsoft.Web.Administration

I recently ran into an issue while attempting to create a C# assembly that was using the Microsoft.Web.Administration namespace.

Whenever I attempted to execute my C# code, I would receive the following exception:


Well, the exception made no sense whatsoever, so I ended up doing a little bit of digging.

The first thing I discovered was that there were 2 versions of the Microsoft.Web.Administration assembly in the GAC:


When I originally selected the Assembly Reference in SharpDevelop, I selected the default version:


However, when I checked the checkbox for "Choose specific assembly version", I noticed the following:


After discussing this with Microsoft Support, I discovered that the different version of Microsoft.Web.Administration (v. 7.9.0.0) ships with IIS Express!

The official version of Microsoft.Web.Administration that is associated with the full version of IIS is v. 7.0.0.0 and is located at this file path: C:\Windows\system32\inetsrv\Microsoft.Web.Administration.dll

Therefore, when I changed my Assembly Reference to v. 7.0.0.0 and executed my C# code once again, I was able to successfully configure my IIS installation!