Wednesday, November 21, 2012

SharePoint 2013 Environment Configuration

When setting up a SharePoint 2013 Environment, you will have to set up a virtual machine as an Active Directory Domain Controller as well as the actual SharePoint 2013 Server.  Whereas this was not a requirement in earlier versions of SharePoint (such as SharePoint 2010), the new architecture of SharePoint 2013 requires components such as the Workflow Manager and the Windows Azure Service Bus require the separation of these server responsibilities.

In addition, if you are using virtualization to set up your SharePoint Development environment infrastructure, you will need to allocate approximately 10-12 GB for the SharePoint Server (Single Server Installation) as well as the recommended amount of memory for an Active Directory Domain Controller (depending on the guest OS).

If you are using automated build scripts such as AutoSPInstaller (http://autospinstaller.codeplex.com/) or the corresponding GUI for this set of PowerShell Scripts (http://autospinstallergui.codeplex.com/), then you will also need to join the virtual machines to an Active Directory domain since the scripts currently do not support standalone/local installations of SharePoint.

For a review on how to set up 2 or more virtual machines that are joined to a domain, you can review this earlier blog post: http://samirvaidya.blogspot.com/2012/05/joining-2-or-more-virtual-machines-to.html

If you want a detailed installation and configuration guide for SharePoint Server 2013, you can download a copy of such a guide from here: http://criticalpathtraining.com/Members/Pages/default.aspx

Monday, November 19, 2012

Tip to always remember when working with PowerShell

I work with PowerShell frequently on a variety of computers as well as virtual machines and whenever I work on a different machine, one of the most common tasks I always forget to accomplish is to change the Execution Policy in the PowerShell window:

Using the Set-ExecutionPolicy Cmdlethttp://technet.microsoft.com/en-us/library/ee176961.aspx

The safest policy to follow is to set the ExecutionPolicy to RemoteSigned, however, in some cases, the ExecutionPolicy may also be set to Unrestricted.  


Multiple connections to a server or shared resource are not allowed

When mapping a network drive, if you receive an error message similar to the following: "Multiple connections to a server or shared resource by the same user, using more than one user name are not allowed", you may find the following Microsoft support article describing possible solutions to the problem: http://support.microsoft.com/kb/938120

However, this solution is a bit difficult and tedious, but fortunately, there is a readily available improved solution to this problem.  You can simply use the following command:

net use * /delete

This command will list out all of the available network connections for deletion. After reviewing all of the current network connections, you can confirm any network connections to delete.  Once these have been deleted, you can then re-establish the network connection with the appropriate user credentials!

Saturday, November 17, 2012

Deploying Custom User Controls for Sitefinity

If you ever have to deploy custom User Controls to Sitefinity that are written in Classic ASP.NET (not ASP.NET MVC), below are the following steps to accomplish this:

  1. After creating the project using Sitefinity Project Manager, open the project using Visual Studio 2010 or Visual Studio 2012
  2. By default the Visual Studio project will have a name of SitefinityWebApp
  3. After the project has been opened in Visual Studio, create a folder in the Visual Studio project to house the User Controls that you will be creating such as "UserControls"
  4. Add an ASP.NET User Control to the folder
  5. Begin developing the content that you want to add to the User Control
  6. Compile the SitefinityWebApp Visual Studio project using the Build option.  NOTE: If you use the Rebuild option, you will end up deleting unreferenced assemblies in the project thus causing additional problems with the deployment
  7. After compiling the project, you will have to register the control in the Toolboxes section in Advanced Settings
  8. After the control has been registered in the Toolboxes section, you should be able to open a Sitefinity Content Page and add the User Control as a Widget to the Page
  9. After publishing the Sitefinity page, you should be able to view the resultant page
  10. If you are then deploying this content to a hosted server for a fresh installation, you will have to do the following:
    1. Deploy the entire contents of the local directory structure
    2. If necessary, change the database connection string to provide the appropriate database credentials on the target hosting server
  11. If you are deploying changes to a hosted server, the steps you will have to follow differ slightly:
    1. Deploy any changes that were made to the local directory structure (such as the creation of the User Controls directory).  Any code behind files are not required, only the .ascx source code which contains the presentation code.
    2. Register the appropriate User Controls in the Toolboxes section of the Advanced Settings
    3. Deploy the SitefinityWebApp.dll to the bin directory on the target hosted server
    4. Add the widget to the appropriate Sitefinity Content Page and verify that the widget is working as expected

Monday, October 29, 2012

Unattended installation of Windows 8/Windows Server 2012

In case you are interested in performing an unattended installation of Windows 8 or Windows Server 2012, here is a very good article describing the entire process including screenshots:

http://derek858.blogspot.com/2012/07/windows-server-2012-unattended.html

You can download the Windows ADK from here: http://www.microsoft.com/en-us/download/details.aspx?id=30652

It is a setup file which will download the remaining files over the Internet.  You can also have it download the files for a later offline installation.

Once the Windows ADK is installed, you will use the Windows System Image Manager to create the answer file as you did with Windows Server 2008 R2 and Windows 7. 

Unfortunately, the Windows 8 and Windows Server 2012 answer files are significantly different from the Windows 7 and Windows Server 2008 R2 answer files, so there will be a learning curve and some trial and error with the answer file settings once again...

Here is the online Technical Reference for the Windows ADK: http://technet.microsoft.com/en-us/library/hh825039.aspx

This is the specific reference guide for Windows System Image Manager in regards to creating and opening an Answer File: http://technet.microsoft.com/en-us/library/hh825114.aspx

You can find a copy of the CHM file on your file system when you install the Windows ADK here: C:\Program Files (x86)\Windows Kits\8.0\Assessment and Deployment Kit\Docs\Unattend.chm

You can find more information about the Windows ADK Documentation here: http://msdn.microsoft.com/en-us/library/windows/hardware/hh825613.aspx

NOTE: I learned an interesting fact/quirk about the Autounattend.xml file.  Even if the default setting is Enabled in the Answer file, unless you change the setting to Disabled and then Enabled so that Windows System Image Manager displays it in bold, the validation error messages will not disappear!

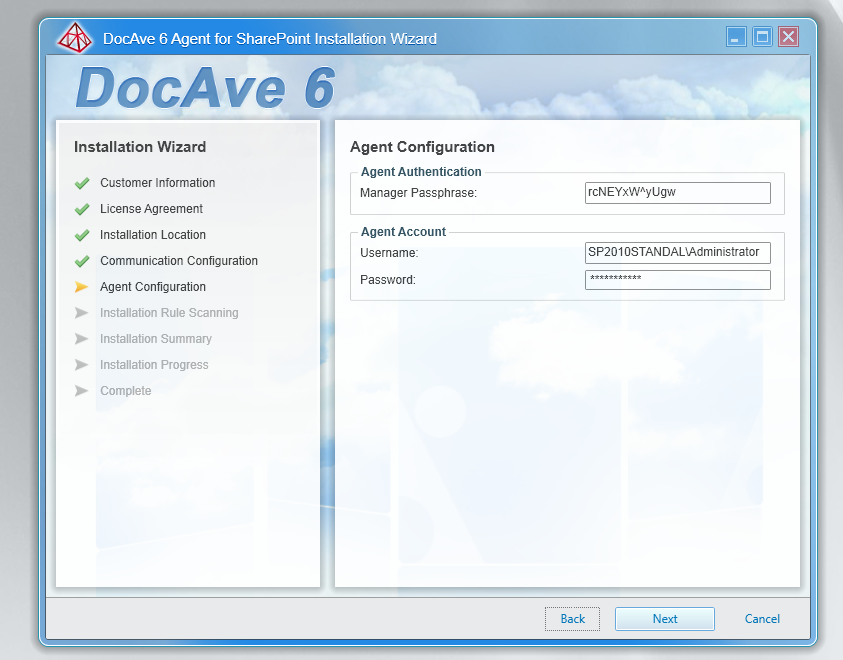
Installing AvePoint DocAve 6

If you have installed AvePoint DocAve 6 from the installation documentation, you may have noticed that the documentation lacks screenshots for many of the installation steps, thus making it difficult to read and follow.

Fortunately, I have captured the overall installation and configuration process that I can share with you below:

The installation consists of a DocAve 6 Manager Installation followed by a DocAve 6 Agent Installation.


In order to log into the system, you will launch a Web Browser that uses a Silverlight plug-in:


The default login name and password is admin/admin.

SharePoint 2013 and Office 2013 Released on MSDN!

SharePoint 2013 and Office 2013 RTM were released on MSDN!

You can download the RTM releases here: http://msdn.microsoft.com/subscriptions